+86 13638632902
 Jason@cleanroomequips.com


 MENU
MENU
A practical guide for architects, engineers, and facility teams — with Deiiang™ product data and real-world cleanroom coving design logic.
In designing controlled spaces, every aspect of a room’s architecture can help or impede contamination control. Cleanroom coving design needs to consider the integral design of architecture, the ease of cleaning and the ease of maintenance, the movement of air within the space, and the need to comply with both internal and external standards and regulations. This article outlines the rationale behind the incorporation of flush floor-to-wall joints and coved transitions in modern cleanroom sanitation design.
Not an Architectural Detail — Figure 1 shows a cleanroom with coved corners and flush floor-to-wall joints.
Floor-to-wall joint spec with sectional view
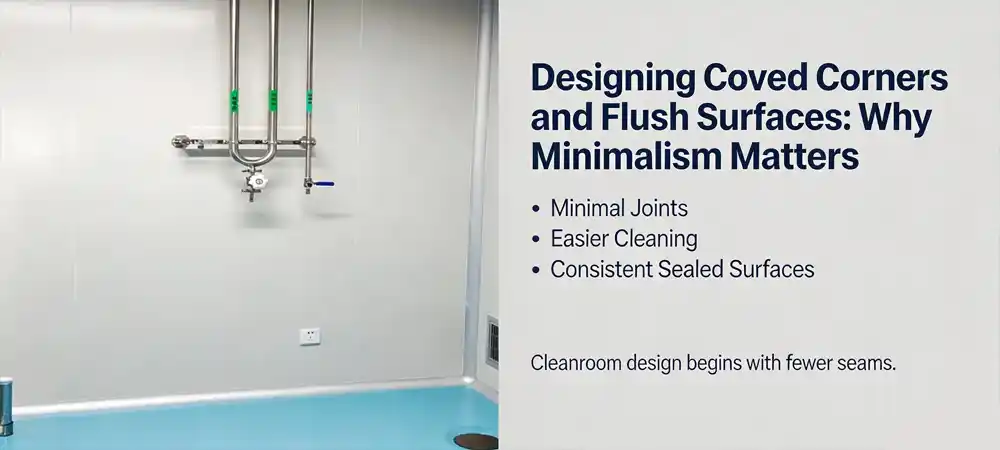
Section view of floor-to wall joint closure detail with integrated continuous bead.
What Is Cleanroom Coving Design?
Cleanroom coving design refers to the rounded transitions (as opposed to the destructive 90-degree angles) between walls and floors. These transitions, also referred to as coved corners or wall-to-floor coves, are seamless surfaces that reduce cleanliness issues.
Coving is applied to wall to wall transitions, wall to ceiling transitions, door frames, and bases of equipment. The goal is to construct a seamless surface that will have no cracks or spaces where dirt or contaminants can hide.
Key insight: There is a high risk of contamination with 90-degree interior corners. Cleaning liquids and tools cannot easily reACH the sharp corner, and liquids commonly remain and pool in that corner. A coved transition eliminates this flaw.
Jokes aside, an effective coved design requires consideration of the radius of the cove, the thickness of the material, the flooring and wall systems, the sealer, the tools used to clean, construction tolerances, and integration with Doors and equipment.
Why 90 Degree Corners are Bad for cleanrooms
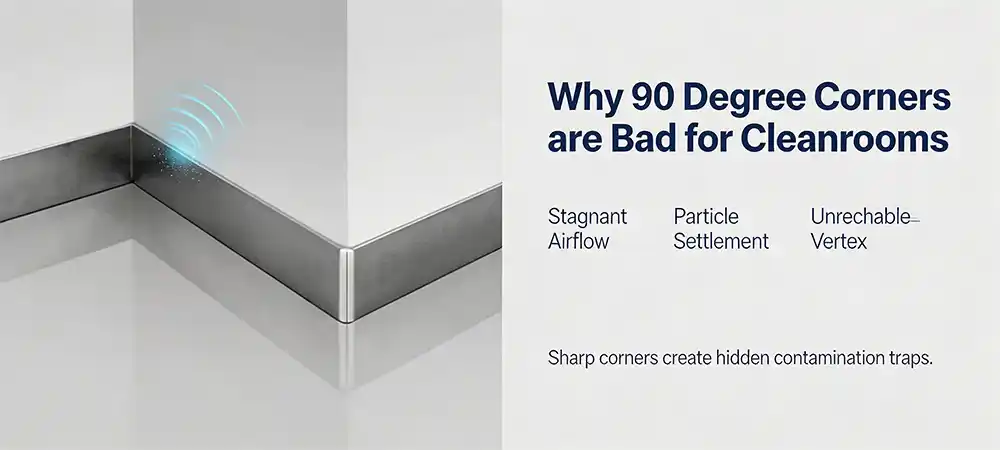
90 degree corners are problematic for cleanrooms as they fall victim to the same containment traps as most other designs. When a flow hits a corner, the flow velocity goes to zero and particulates settle. 90 degree corners also create a vertex that cleaning tools can never reach. Over time sealants begin to crack, coatings wear, etc, and corners end up being a sanitation risk.
The consequences will differ from industry to industry:
- Pharma and BioTech: Residues in the production of medicines/bio products can cause whole batches to become unsalvageable. The newer Good Manufacturing Practices audits require a clean room with proof of sanitary design and coved transitions.
- Manufacturing of Medical Devices: 90 degree corners can cause non-sterile devices to be made.
- Pharma and Electronics: Tiny particles settle in corners, affecting yield and requiring more frequent cleaning cycles.
- Food and Cosmetics: Grease, powder, moisture, and other particulates continue to grow through a normal cleaning.
Why Coved and Flat Corners Work
With these types of corners, there are no ledges or steps and cleaning tools can reach the joint in its entirety. Because of this, there are no stress risers on the joint, so closures hold their seals and there is no ledge.
In studies, replacing sharp corners with coved transitions can reduce cleaning time by as much as 25–40% for high-grade cleanrooms, which translates to reduced operational costs and less downtime.
Why Are Floor-to-Wall Joints Important?
Floor-to-wall joints meet floor and wall surfaces without a baseboard or step. This eliminates a dust and liquid collecting ledge. Floor-to-wall joints also allow cleaning tools to transition seamlessly from the floor to the wall, allowing for the cleaning of gaps and improving overall sanitation.
These joints are designed to create a flush surface to be sealed. If this is not the case, liquids used for cleaning will permanently damage surfaces and create space for impurities to grow.
For design, surface seals should be flush at all times. Surfaces that are inconsistent in flushness to greatness are impermissible junctions.
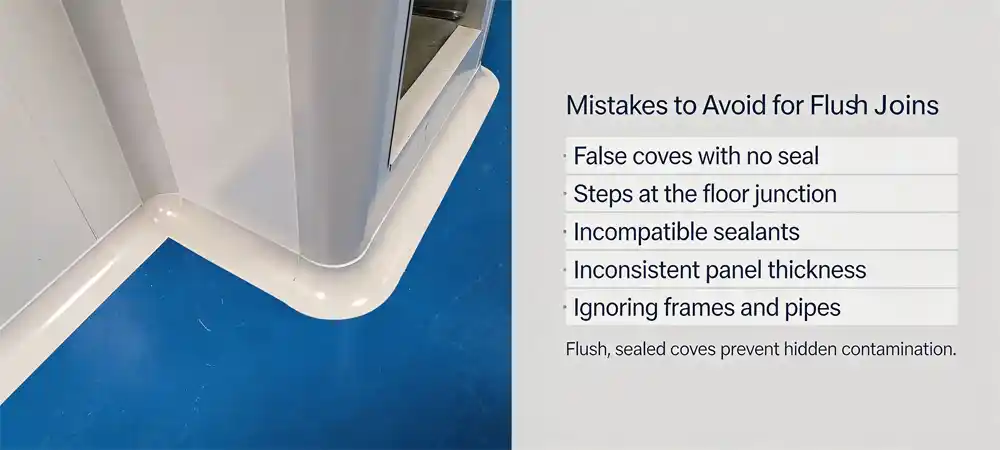
Mistakes to Avoid for Flush Joins
- Installing coves that look nice but do not address the underlying seal
- Creating a step-brand new cove in junction with the floor
- Incompatibility in sealant and floor cleaning agents
- Inconsistent thickness of wall panels and flooring
- Ignoring door frames, cove bases, equipment, and pipes
⚠️ Heavy-duty cart trafficking and coves: a potential hazard
In places where carts or forklifts are used with frequent traffic, coved corners can be damaged. A radius is not enough, and the wall must be thick enough to meet the criteria of cove materials used. Deiiang™ offers impact‑rated coves that can withstand a 100 kg load at 1.5 m/s without permanent deformation, verified by internal drop‑test data.
A cleanroom is only as clean as its least cleanable joint.
How to Select the Appropriate Radius of Cleanroom Cove
There is no standard answer for the radius of a coved corner. An example would be R50 or R75 having better cleanability versus coved corners with an R25 radius that may be harder to clean with relative ease and to preserve as much floor space as possible.
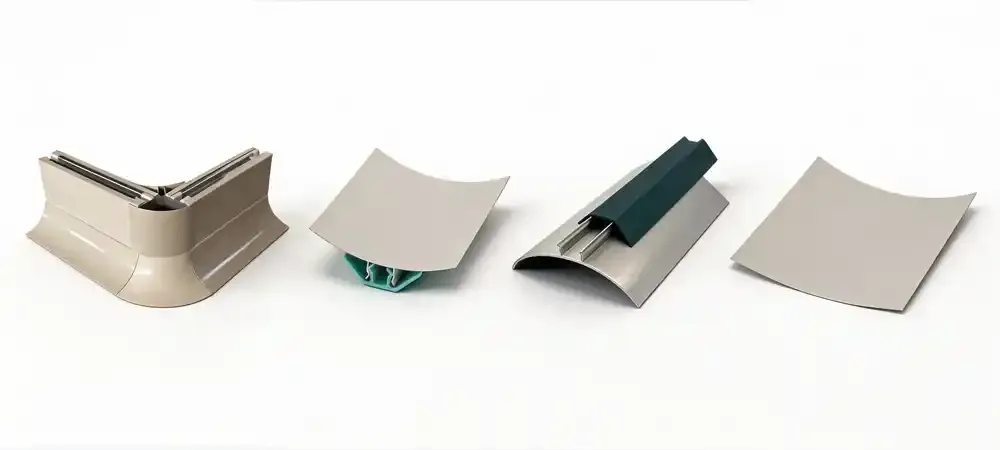
Key considerations:
- Degree of cleanliness: A higher iso classification (e.g. iso 5–6) will usually require a larger radius.
- Utilization of cleaning tools: The radius should be wide enough to accommodate the width of mops, wipers, and brushes.
- Choice of floor system: Example would be PVC, epoxy, polyurethane, and terrazzo that would all be of differing thickness and flexibility.
- Choice of wall panels: A cove must align with the panel thickness and the edge profile.
- Available space: In small rooms or corridors, a large radius may reduce the usable area.
- Ability to construct: Some construction tolerances should be allowed for wall verticality and floor flatness.
A radius of R30-R50 is most frequently used in cleanrooms for the pharmaceutical and electronics industries, and an R50-R75 is preferred in the food industry for processing and in wet areas.
One of the most neglected considerations in cove selection is chemical resistance. The daily use of IPA, peracetic acid, VHP, or sodium hypochlorite for cleaning can cause degradation of the material and lead to cracking, surface discoloration, and eventual failure of the sealant. The table below summarizes Deiiang™ internal test results of four common cove materials.
| Material | IPA 70% | Peracetic Acid 0.2% | VHP 300ppm | Sodium Hypochlorite 1% |
|---|---|---|---|---|
| PVC (Standard) | ✔ Excellent | ▸ Good (≤200 cycles) | ✔ Excellent | ▸ Moderate (staining) |
| Stainless Steel 304 | ✔ Excellent | ✔ Excellent | ✔ Excellent | ▸ Pitting risk (prolonged exposure) |
| Anodized Aluminum | ✔ Excellent | ▸ Surface dulling | ✔ Good | ✘ Not Suitable |
| Polyurethane | ✔ Excellent | ✔ Excellent (≥500 cycles) | ✔ Excellent | ✔ Good (≤0.5% Swelling) |
* Based on Deiiang accelerated aging tests at 40°C and 80% RH. "Excellent" means there is no change visible after 500 wipe cycles. "Good" means it is acceptable for routine use with some limitations. Please consult the complete compatibility report for your sanitizer concentration and contact time.
For GMP-regulated facilities, we recommend PU or stainless steel where peracetic acid or VHP is involved, and PVC or anodized aluminum is where only IPA is involved. Deiiang™ provides detailed sanitizer-compatibility sheets with every project to aid your validation documentation.
Deiiang Cleanroom Coving System
At Deiiang™, we are proud to present what we believe is the first fully integrated cleanroom cove design solution that goes beyond simply providing decorative trim. This integrated solution is designed and manufactured to seamlessly interact with cleanroom wall paneling, cleanroom flooring, and cleanroom sealing systems. Special care has been taken to ensure that the design is focused on hygiene and durability, and that the assembly is user friendly.
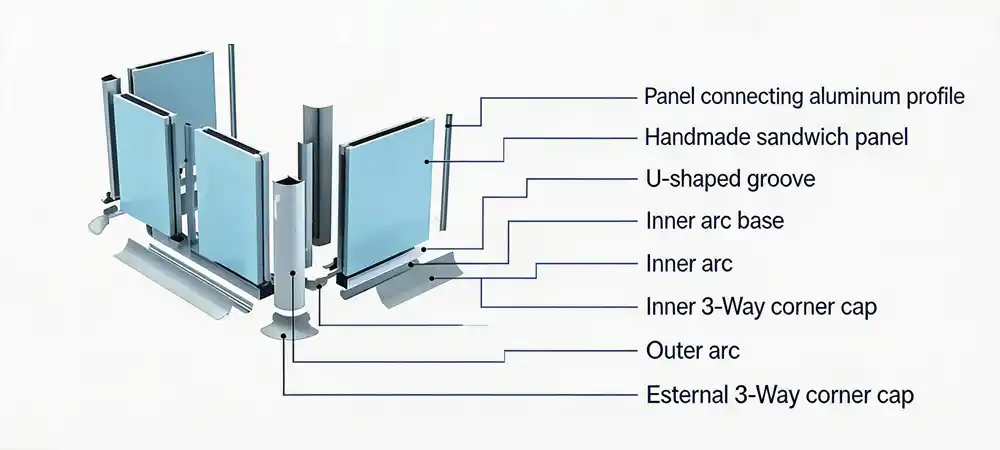
Scope of Delivery
- Profiles that are prefabricated with standardized radii (R25, R30, R50, R75, and R75)
- Transition strips (floor to wall)
- Adhesives and sealants
- Fittings (corners and ends)
- Technical drawings
- Installation assistance
- Custom-length pieces to accommodate walls of non-standard dimensions
Prefab over Field-Cut — 3D Node Precision
Traditional field-cut coves often leave multiple seams at wall-wall-floor (tri-corner) intersections that are difficult to seal and therefore, prone to leak.
Deiiang™ reduces the number of seams to one using prefabricated 3-way corner caps, eliminating (4) separate cuts.
These structural nodes maintain continuous seals and pass helium leak testing (and 150 Pa pressure) on critical applications including high-grade pharmaceutical and semiconductor cleanroom facilities.
Product Specifications
- Standard radius: R30 / R50 (custom up to R75)
- Material: Antimicrobial PVC / UV-stabilized polymer / stainless steel variant
- Surface finish: Smooth matte, easy-clean
- Standard length: 2400 mm (custom length up to 6000 mm)
- Sealant compatibility: Silicone, polyurethane, acrylic
- Temperature range: -20°C to +80°C
- Warranty: 5 years (materials and workmanship)
* Figures reflect Deiiang internal tests. Actual results may vary.
Deiiang™ Project Case Study
Project: Biopharmaceutical gmp cleanroom – Singapore
- Industry: Pharmaceutical (sterile injectables)
- Area: 1,200 m²
- Cleanliness grade: iso class 5–7
- Scope: Wall panels, flush floor-to-wall joints, coved corners, door frames, and equipment interfaces.
- Year: 2024–2025
The client planned to streamline their production suite to comply with updated GMP Annex 1 requirements. The previous setup had conventional 90° corners and raised baseboards, which were hard to clean and displayed signs of sealant failure after being sanitized several times.
This is an overview of a cleanroom project we did for Deiiang™.
This project required coved walls and flush floor joints.
Here are some construction and design details of the project.
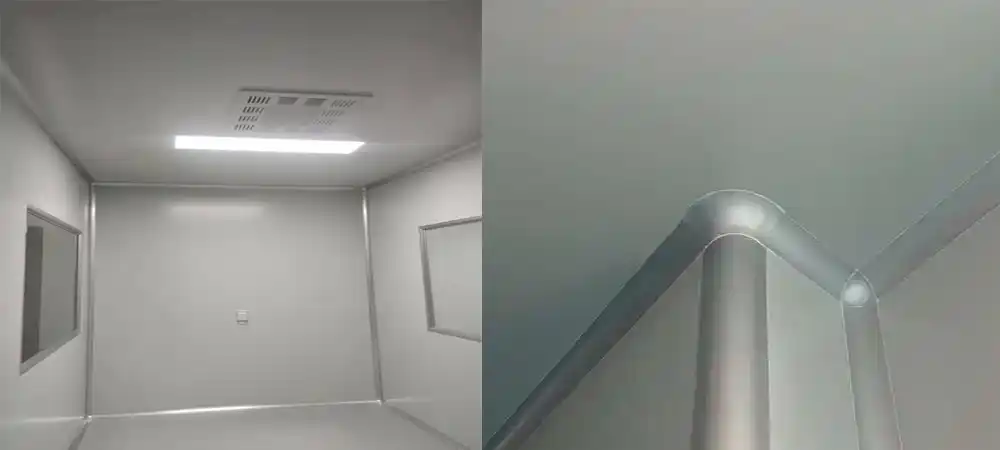
Coved Corner Detail: This is an example of a coved corner detail with an R50 radius and a continuous seal.
Flush Floor to Wall Joint Detail: As in the project, this detail shows a flush joint between the wall and floor with no step.
Completed Cleanroom: Here is the completed cleanroom with the completed suite that has a sanitary surface.
Challenges:
- Existing walls had up to 8 mm height deviations over 3 m
- Existing floor had vinyl and epoxy sections that had differing thickness
- Very high air-tightness requirement (> 50 Pa) on pressure differential
- Client required the solution to work with three different sanitizing agents
- Construction timeframe was 6 weeks from delivery of materials to completion.
Deiiang Solutions:
- On-site laser measurement to create custom node drawings
- Adjustable cove profiles to handle wall and floor thickness with continuous sealant with applied EPDM foam with a continuous seal
- Pre-tested sealant for IPA, peracetic acid, and bleach
- Prefabricated corner units to limit on-site fabrication time
Results:
- Installation completed in 5 weeks and 1 week ahead of schedule
- Sealant failures during the initial validation testing were absent
- Client reported a 30% reduction in cleaning time for the vertical wall-floor cleaning
- Passed GMP Annex 1 Inspection with no wall and floor joint observations
- Patent holding, the facility is now the reference Internal Training site for the Client
Designing a Flush Floor-to-Wall Joint
Designing a flush floor-to-wall joint requires a team effort between architects, engineers, and contractors. The process begins with collecting accurate site data and ends with a detailed node drawing that can be implemented on site.
Before finalizing any design for installation in a cleanroom, a contractor must consider many other parameters. These include detailed floor layouts in conjunction with room layouts, the type and thickness of wall panels, the type and thickness of floor systems and finishes (e.g. epoxy, PVC, polyurethane etc), the location of doors and equipment, the target level of cleanliness and the pressure differential, the cleaning and sanitization procedures to be followed, and the building and fire codes.
Thermal Expansion and Contraction
Dealing with sealing and the expansion of flooring (epoxy screed, for example) and the insides of walls (rock-yarn sandwich panels, for example) has a major difficulty with thermal expansion. Over a distance of 10m, a temperature change of 20°C can result in a movement of 2 to 4mm. This can tear apart most seals. This has been addressed by the use of a cove profile with a pre-compressed foam expansion joint, which will allow for expansion and maintain a flat surface. This detail has, so far, also prevented cracking of seals in all of the 40+ Deiiang™ projects that have been done in both the Tropical and Temperate regions.
Briefing for design workflow.
- Site measure
- Select radius
- Match wall/floor thickness
- Sealant & fixing design
- CAD node drawing
- Mock-up
- Obtain client approval
- Production & installation
Design nodes of interest.
- Wall-floor, primary cove
- Internal wall corners, coved transition
- Wall-ceiling, if needed
- Bottom of door frame, seamless threshold
- Perimeter of equipment base
- Pipe and conduit penetrations
Cleanroom Coving installation
Designing a good cleanroom is a balance between design and installation. A poorly installed cove will cause a profile to fail. The following steps are standard for cleanroom coving design projects.

Pre-installation:
- Check that walls and floors have a flatness tolerance of ≤ 2mm/m.
- Check that walls have a vertical tolerance of ≤ 2mm/m.
- Confirm the quantity of the materials and their condition.
- Install a sample for the client’s approval.
Installation steps:
- Surface preparation: Clean and prime surfaces; remove dust, oils, and loose materials.
- Marking: Mark the location of the cove based on the design elevation and radius.
- Dry-fit cove sections, corners, and end caps; check for design alignment.
- Using the manufacturer’s recommended adhesive, apply to the walls and floor.
- Cove profile section: Firmly press into the adhesive to fill the profile; avoid gaps.
- Apply compatible sealant to the top and bottom edges and tool to a smooth finish.
- Remove all adhesive and sealant overflow; check for voids, bubbles, and damage.
- Sealant should be cured completely before cleaning or allowing traffic. Cure times may vary but typically fall within 24–72 hours.
Coved Corners Maintenance Guide
Even the best cleanroom cove design requires routine inspections and care. A planned maintenance program helps cove aging and guarantees ongoing effectiveness of hygiene.
Daily Cleaning:
- Cleaning agents (from the manufacturer’s approved list) must be compatible.
- Wipe with the cove surface in one direction to avoid pushing debris into corners.
- Inspect for guiltless, discoloration and deteriorated sealant.
- Rinse and dry to prevent residue.
Quarterly Inspection:
- Inspect sealants top and bottom edge adhesion.
- Deterioration, cracking, peeling, and bubbling.
- Cove seal should be flush with the floor.
- Look for any gaps in corner junctions.
- Findings should be recorded and repairs should be scheduled.
When Considering "Why" a Repair Must be Done:
- Deterioration is often caused by movement in the substrates or by the cleaning agents, these must be identified before sealing.
- Fully remove deteriorated sealants and use new sealants of the same type.
- Repairs can be dated and kept for audit and validation purposes.
Common Mistakes When Specifying Cleanroom Coving
Only clean path is considered – An lovely cove with an uneven surface or a crevice still conceals dirt and must be cleaned using the same tools.
The cove is approved, but the system is not – Wall panels, flooring, and the sealant must be coordinated.
Ignoring major errors in the existing system – Existing walls and floors are rarely even; ugly walls should be measured before the final in the factory.
No sample was seen. – Customers can approve the aesthetics and easiness of cleaning before production, and flaws in the system of the cove residence can be seen.
Using sealing materials with unknown compatibility data – Sealing materials must share compatibility data with the cove materials, wall, floor, and cleaning agents. Incompatibility can result in early failure in operation.
Industry Pitfalls – Three Hidden Traps That Ruin Cove Installations
Part 1 – The Silicone Bubble Trap
What happens: Air is trapped behind cove profiles when sealant is placed over an inadequately filled cove backing. These voids expand and contract due to autoclave cycles, developing channels to support bacteria, which go unnoticed until contamination is evident.
Deiiang™ solution: This problem can be easily solved with the two-step back-filling method. The first step is to fill the void with a low-viscosity primer, and the second step is to apply a full bead of sealant. The installation manual issues a pressure-test protocol, designed to provide safety against voids.
Part 2 – Substrate Moisture ≥ 4%
What happens: When cove materials are placed over concrete with a moisture content greater than 4%, the moisture becomes trapped. During the next 6–12 months, moisture moves upward and results in the cove heel blistering and cove heel failure, a common failure in many remodeling projects.
Deiiang™ solution: Our site survey checklist includes a calcium carbides moisture test before any adhesive is applied. High moisture slabs are treated with a vapor-barrier primer as well as a breathable cove backing to allow moisture to escape laterally and also minimize blistering.
Pitfall 3 - Radius Compatibility of Cleaning Tools
What Happens: You might have 25mm coves, but standard flat mop heads have a 30mm thick edge. Because of this, the mop cannot reach the bottom of the cove, leaving a dirt ring that requires manual wiping.
Solution: We send out a radius to tool compatability chart to show which tools reach a particular radius. In the case of R25, we recommend a mop with a beveled edge of less than 18mm. If your mop heads are standard throughout your company, we can contour the radius to match your mop heads. This is a highly requested custom job that saves a significant number of labor hours.
FAQs
What is Cleanroom Coving?
Coving is a design with a curve at the intersection of the floors and walls of a cleanroom. This, along with other similar curves where walls meet, helps to facilitate cleaning, and get rid of sharp corners that can create traps for contaminants.
What are Flush Floor To Wall Joints?
These joints are a smooth transition between your wall and floor without a protruding ledge. With no protruding ledges, tools can easily transition from cleaning the walls to the floor, thus saving cleaning time.
What Radius is Best for Cleanroom Coving?
It is hard to pinpoint a single best radius. An R30 to R50 is common for cleanrooms where pharmaceuticals are made, and electronics are manufactured. On the other hand, R50 to R75 is used in food and wet areas.
Can I Use Deiiang Coving for a Cleanroom Renovation?
Yes, Deiiang™ custom coving is perfect for renovation projects. Deiiang does onsite measuring and supplies adjustable coving profiles that can be tailored to fit your cleanroom walls. We are happy to provide support for your install.
Does Cleanroom Coving Improve GMP compliance
Coving design adheres to sanitary design features via GMP guidelines. Coving design in itself is not considered GMP compliance. However, it is an important component of an overall design for a cleanable and verifiable environment. When accompanied by an outlined set of procedures and a validation schedule, it is a clear indication of GMP readiness.
How Long Does a Cleanroom Coving Project Take?
Cleaning room coving design typically spans 4 weeks to 3 months. Several steps constitute this duration: design takes 3 to 5 days, sample production takes 5 to 10 days, full production takes 10 to 25 days, shipping takes 3 to 40 days, and installation can take 3 to 10 days depending on the area.
What Information is Needed for a Quote?
For a quote, we need a floor design (in PDF or DWG), the wall and floor panel system specifications, the radius and overall length of the coving, the number of corners in the design, the location of the project, the deadline, and if you wish to have installation help.
How Do I Maintain Coved Corners?
To maintain coved corners, it is best to use a non-abrasive cleaning tool and regularly inspect the coved corner and floor coving seam. Tending to small repairs of aesthetic and structural integrity will maintain sanitation of the area.
What is The Chemical Compatibility of Deiiang Coving and VHP?
Excellent resistance to degradation is shown for Deiiang™ PU and stainless steel coves via VHP (up to 300 ppm) following 500 cycles with no surface deterioration. While PVC is also compatible with VHP, some yellowing may occur. A full compatibility report can be submitted upon request.
Conclusion
Joints and coved corners design are not cosmetic additions to cleanroom. In fact, they play important roles in the economy and efficiency of the operation and overall cleanroom design. Aesthetic joinery in the traditional sense using basic baseboard systems and 90 degree corners are ineffective in the construction of the design of a cleanroom and result in unsanitary and inaccessible systems hinder the overall design.
Facility owners can take advantage of coved transitions and flush surfaces to cut cleaning times, reduce upkeep costs, and improve hygiene. Success depends on design, selected materials, and precision installation. Applications with mere generic solutions can quickly fail.
Contact Deiiang™ for a project‑based recommendation.
📋 Submit your project — Provide your Country, Industry, Area, Clean class, Cove radius, Wall/floor details, and Timeline
💰 Get a custom quote — Request a Quote, Ask for Technical Advice, Upload Your Drawing, Get a Cove Recommendation
Deiiang™ offers a complete system of cove profiles, transitions, and technical support—from design to installation. With products engineered by Jason Peng and backed by project experience, Deiiang helps clients achieve sanitary, durable, and compliant cleanroom environments.
Planning a Cleanroom Coving Project?
Share your cleanroom layout, wall-panel details, floor system, required radius, and project location with Deiiang™. Our team can review the floor-to-wall junction and recommend a suitable coving solution.
Request a Technical ConsultationReferences
- iso 14644-1:2015 – Cleanrooms and associated controlled environments
- EU GMP Annex 1 – Manufacture of Sterile Medicinal Products
- ASTM E2352 – Standard Practice for Cleanroom Design
- NEBB – cleanroom testing and Certification Standards
- Deiiang™ – Cleanroom Building Systems
© 2026 Deiiang™. All rights reserved. Product designs by Jason Peng. Information subject to change without notice.